So this weekend I finally dragged my ass down to Radio Shack and picked up a few necessary parts (protoboard, alligator clips, voltage regulator, etc) to start working on my little joystick controller.
Because I'm an idiot, it took me about 2 hours to do what should have taken about 5 minutes. I didn't fully understand the whole two hemispheres of the protoboard and this caused me to burn up 2 LEDs (2 *overpriced* LEDs I might add) as well as not get the voltage regulator working. Once I finally understood that, I succeeded in almost burning up one of the axis pots of the joystick. See, I didn't (don't, actually) understand the whole "shit's gotta be goin back to ground" principle and I have ~5V just sitting there in the joystick's pot. :P
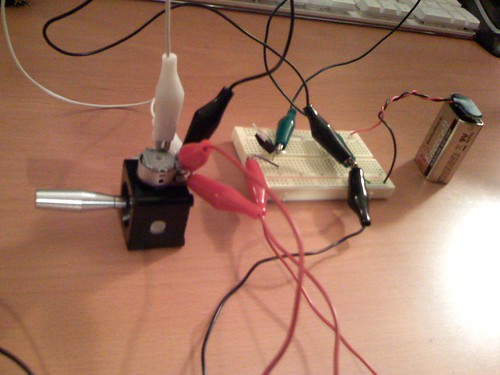
Anyway, by the end of the sitting, I had a working prototype which is what you see in the picture above. And I did had a few hours of fun hooking it up with the modular and I'm really excited about getting it done. In addition to the one joystick pictured, they'll be a second joystick (without it's retention springs removed) and a handful of trigger/gate buttons. This weekend I hope to find a nice enclosure and start soldering stuff together. Of course, I'll document the rest of the process as much as I can.

8 comments:
Man...AWESOME! I was curious... can you give me any hints on building one of these myself? I'd rather (and it seems you would too) rather build something with gates and axis points and save 700 bucks on the new wiard controller, lol. I"ve already got the 2 pots! :) thx man if you can!
Sure thing, and you're right, I'm basically going for my own style Wiard controller.
At this stage, I'm still learning through trial and error. What I'll do is write up an extensive post which details all the components and how they are wired when I'm all done. Since I don't completely understand everything I'm doing right now, I don't know if I can explain it clearly enough to someone else.
I can say, the gates are real easy to make, just get a momentary, normally open (NO) switch and hook up the + voltage from the battery to one side and the positive (tip) of your patch cable/jack to the other side. Then connect the ground of the battery to the sleeve of your patch cable/jack. When you press the switch, instant gate ;)
The power supply is pretty simple too. Euro stuff generally uses 5v, so I'm using a 9v battery with a 5v regulator on the end; so it only lets 5v through. I think this works by burning off those 4v through heat...but I think that's the only way to do it. Eventually I'll use a wall wart...but not until I don't have to touch any of those wires with my hands!
Also, just so it's clear, I didn't make the actual joysticks; I ordered these ones from Analogue Haven. They are a bit expensive, but they are nice quality and I couldn't find them cheaper anywhere else.
I found 3 of them at a discount electronics warehouse.... (10 bucks for all of them)
;)
If i go back... I could prolly try and pick some up forya. I'd like to use arcade style buttons for the gates. Now I wonder.. how to do the axis generator that wiard put out ;)
whoa, 10 bucks!? Are they the same ALPS Joysticks? Crazy.
I'm not totally sure how the Wiard axis works...like are those various axis points voltage ins (like a joystick controlled xfader) or are just outputs. In either case, that's beyond my skills. The box I'm going for will have the two joysticks with each axis having a 0-5v as well as 5-0v outs as well as two pots, one for setting max voltage range and the other for min. Then 4 or so buttons triggering gates. I'll probably have two gate out for each button, one out is a high signal when pressed and the other is high when released (invert).
good going-- congrats on actually getting down and doing some real DIY. Can't wait to see what you do about front panels and the sort. You thinking of using front panel express?
What's front panel express? I was going to find a nice box (possibly metal or wood, something with weight) and just label by hand or something.
Solid with some weight is most important.
Oh-- okay. So you're not thinking of mounting the joysticks in your case? I've seen it done both ways of course... Anyway, Front Panel Express is an online service that basically lets you use a CAD program that you download to build front panels-- http://www.frontpanelexpress.com/
I think that I'll end up using front panel express when I get my CGS modules built at some point in the future (unless I figure out some cheaper way to get nice front panels that won't clash with the rest of the synth).
Your plan sounds cooler and potentially more original, though.
Yeah I was not planning on mounting in the A100P case simply because space is so precious.
It would be nice to have a metal face to the top of the box for the joystick though, so I might do that. Thanks for the info!
Post a Comment